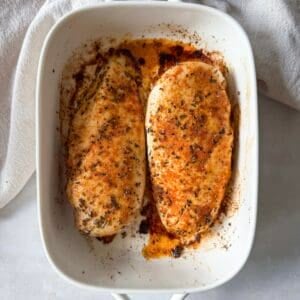
Oven Baked Chicken Breast, How to Make it Juicy
These are all my tips and tricks to making juicy Oven Baked Chicken Breast that you can meal prep and use in so many different ways! It's by far the way I make chicken most often because it's quick, easy, versatile, and pretty hands-off so you can spend your time finishing the rest of dinner while it bakes!
Equipment
Ingredients
- 1 lb chicken breasts (~2 medium sized chicken breasts)
- ½ tablespoon extra virgin olive oil
- ¾ teaspoon Morton's kosher salt (if using fine table salt, use ½ teaspoon and if using Diamond Crystal kosher salt, use 1 tsp)
- ¼ teaspoon black pepper
- ½ teaspoon garlic powder
- ½ teaspoon onion powder
- ½ teaspoon dried thyme
- ½ teaspoon dried oregano
- ½ teaspoon paprika
Instructions
- Preheat the oven to 425℉ (218°C). Gently pat the chicken dry with paper towels and place it in a baking dish in a single layer. Lightly coat both sides of the chicken breasts in olive oil.
- In a small bowl, combine the seasoning mixture. Season both sides of the chicken and pat the seasoning mixture into the chicken.
- For best results, let the seasoned chicken breasts sit for 15-30 minutes. This will allow the salt to penetrate into the chicken which helps it get more flavorful and juicy.
- Bake the chicken for 18-25 minutes, flipping halfway through and again at the end for best results. Cooking time will vary depending on your oven and the thickness of the chicken. Smaller chicken breasts will cook quicker than large ones. The chicken is done when the internal temperature is 165℉ (75°C). Let the chicken sit at least 10 minutes after it comes out of the oven. This helps the juices the redistribute into the chicken to prevent it from drying out. Cut the chicken against the grain.
- Hint: For the juiciest, most flavorful chicken, my 2 tips are to season it ahead of time (or at least add the salt ahead of time), and use a meat thermometer to avoid overcooking because it can go from juicy to dry very quickly.
Notes
Expert Tips
Taking a couple extra steps can make a big difference in how the chicken breasts taste. The two biggest concerns with baking chicken breasts in the oven are that they will either be dry or bland. So here's my best tips to ensure juicy baked chicken breast every time!
- If your chicken breast is thicker in the center or one side, pound it to even thickness. Cover it with parchment paper or plastic wrap or put it in a large ziplock bag. Then pound using a mallet, rolling pin, or bottom of a heavy pan.
- Coat both sides of the chicken in the olive oil and seasonings both sides of the chicken.
- For the best flavor throughout the whole chicken breast, season as far in advance as you can (up to 24 hours). The salt in particular helps to draw out moisture that will then redistribute into the meat to keep it juicy. Salt will also penetrate inside the chicken breast as it sits. So even if you only salt it in advance, it makes a big difference.
- Even seasoning the chicken breasts 30-60 minutes in advance of baking it makes a big difference!
- Use a baking dish rather than a baking sheet or sheet pan in order to keep the moisture locked in.
- Flip the chicken breasts halfway through cooking and then flip them again right after the get out of the oven.
- Let it cool in the baking dish for around 10 minutes before cutting into the chicken.
- When you slice the chicken, do so against the grain. To do so, look at the direction the muscle fibers are running (they look like faint lines). Cut in the opposite direction.
- Refrigerator - store cooked chicken in an airtight container in the fridge for up to 3-4 days.
- Freezer - store cooked chicken in the freezer in a freezer safe container for up to 3 months. Slice or dice the chicken before freezing to make it easier on yourself!
- To Reheat - thaw in the fridge overnight and reheat in the oven or in the microwave. To prevent it from drying out in the microwave, you can add a splash of broth or water.
For more nutrition information and tips, visit mallorythedietitian.com. I hope you enjoy this recipe as much as I do! 😊
Nutrition
Serving: 3 oz (cooked)Calories: 140kcalCarbohydrates: 1gProtein: 24gFat: 5gSaturated Fat: 1gMonounsaturated Fat: 1gCholesterol: 65mgSodium: 285mg
Tried this recipe?Let us know how it was!
